|
On this page i want to explain something about props, just some general info on the ins and outs on choosing, balancing and sharpening your props.
Introduction
The prop is a key component of your boat. It is the part that turns rotational power into forward momentum, so if it is inefficient or poorly matched you will not get the best from your boat. To work properly it must be statically and dynamically balanced. If it is not well balanced it will cause vibration and this willsoak up power and destroy your bearings. Balance is not really and issue with glass filled nylon props, unless they are damaged. Plastic props flex, and you cannot predict how – so avoid them. Metal props need balancing and sharpening. Blunt props act as paddle wheels and result at worst in prop walk, destroying the handling of a boat. Unbalanced blade shapes can also cause vibration and destroy bearings. So here we present another in our beginners series ... How sharpen and balance a prop. Most metal props are supplied unfinished and will require you to do some work in order to make them useable.
Equipment
You will need something to asses the balance of your prop, and some tools to hold it, remove material, and finish the surface. My tool selection is a prop balancer, a medium sized engineering file, a couple of flat swiss files of varying cuts, a prop holder, and wet or dry paper. Yep you may have noticed - no power tools, that's not to say you can't use them but I have deveolped a sytem that works well for me and being a pragmatic sort I stick with it. If it's not bust don't fix it!!
Choosing a suitable balancer is not straightforward!! Most will work well but have limitations that will leave you makeing bits to suit your specific needs. For example:
- the Graupner balancer is fine for props that are threaded 4mm and have a hole all the way through. That is basically ECO props so if that is all you intend to do that's great and it is cheap.
- the Octura balancer has hardened steel edges that the prop shaft rolls on, it therefore needs to be set exactly level. Against that it comes with shafts suitable for balancing all Octura props, and therefore props by other manufacturers with 1/8" 3/16" and 1/4" bores.
I use a Slec balancer for the usual balancing
I use a magnetic balancer for the tougher jobs, it does not need levelling so you can use it anywhere- e.g. at a meeting (which is important to me). Against it came with a 2mm shaft and cones to hold the props. The cones were out of balance - so I made shafts for 1/8" and 3/16" props as they are what I use most. You could balance the cones instead though. For me the replacement shafts were easiest and work well
Preparation
First please apreciate that I have been doing this for years, this is not all of what I do as some of it is a feely thing and cannot be explained. This then is to give you a good starting point from which to develop your own techniques. For our purposes here we will assume that the prop has been produced by someone that knows what they are doing - and that therefore all you need to do is apply a good finish to the prop to achieve good performance. I say this because some props may look flat bet they are not, trailing edges may have a tiny kick in them that is extremely important to their performance so unless you absolutely know the effect of it (in which case stop reading this) don't go filing away at areas when you have not been told to!! If you intend to use power tools on berylium bronze props use a face mask - berylium is really nasty stuff!!!!!!!!!!!!!!!
Down to business
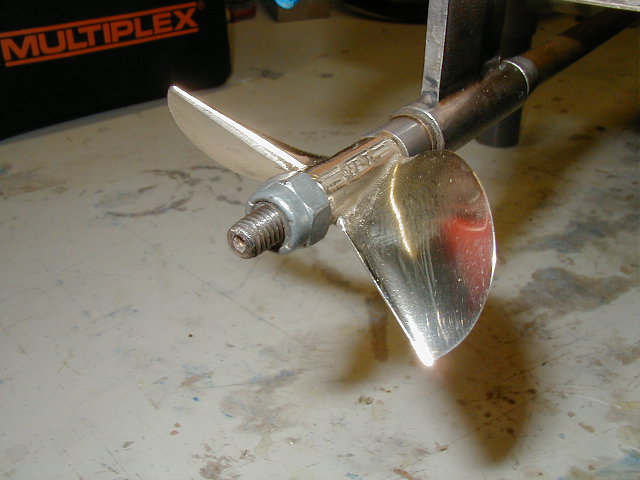
I use a piece of steel of the same size as the stub shaft to hold the prop whilst I am working. You can use a dog to hold it in position but it is not absolutely necessary. Gather your tools and clear a work area, oh and get a small cup of water
The concave surface is the most important one do not remove any material from here
From the sides use a file to remove any moulding burr back to the outline of the prop. Careful you don't go too far. While you are at it The edge of the trailing edge should be flat, and the corners sharp. You can do this now or later it's up to you.
Use a file to sharpen the edges by removing material from the front of the prop (the bit that faces the front of the boat in use). A prop has a cross section that the manufacturer has spent many weeks,months, or years developing - they defend their cross sections with a passion and for a reason so don't destroy it. All filing should follow the current countours of the prop and not leave heavy gouges. A second cut file is OK to start with - I use a big one and I avoid swiss files as they are too small and can lead to deformation of the surface.
When you cut your fingers touching the edge of the prop (or when its sharp) use the balancer to determine which blade is heavy and where. The heavy blade will come to the bottom or tilt down dependent on your balancer. (I prefer the horizontal spindle mounted ones). The heavy bit of the blade is on a vertical line through the middle of the spindle. I generally move the prop round 45 degrees and repeat the balance a few times to ensure that I know exactly where this line is. Having got the line remove material from along it... repeat the process until the prop spins free and you cannot determine a heavy part. The heavy part is probably at the thickest point along this line - a pair of calipers can help you find this. Sometimes the prop will run heavy beacause of a balnce of material on two parts of the prop, when this happens you cannot achieve perfect balane - it keeps see-sawing between the two points and the heavy part of the prop will be between them. Don't give up you will get there in the end
Finishing
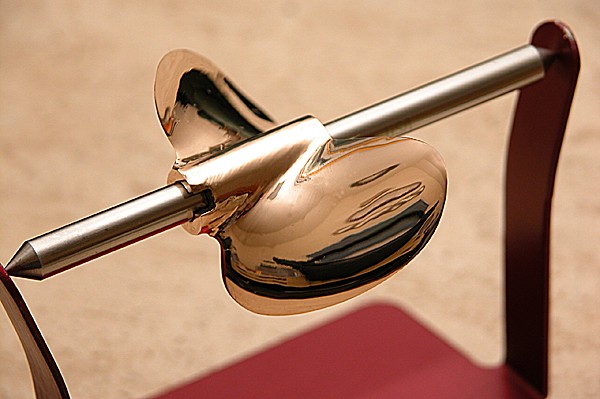
Right so the prop is balanced, now you have to finish it. There are two schools of thought on this. One says polish to a mirror and one says satin finish. I use a satin finish so I finish with wetordry. First I rub the concave face with dry paper - this generates black marks at some points and gives you an idea of the contour. The contour needs to be smooth without lumps EXCEPT for any kicks in the rear edge which the designer has moulded in. Smooth the face to a good finish but do not remove material. Once you have done this do the front face as well - and then check the balance again. It may be ever so slightly out , but hopefully not. If you are in favour of highly polished finishe go for it now, if not you are done.
Yep it's that easy.!!!! Now you are the proud owner of a useful and useable prop
Next steps
Advanced prop manipulation... - some things you can do.
1. You can trim the leading ears off - these are the least pitch portion of the prop and are viewed by some as the speed limiter. Whatever the idea is that you accelerate the water smoothly over the prop.... You can calculate when you need to make this change.......
2. Thin the blade - as above but just thin the blade - I prefer to keep the original blade contour if possible as the foil shape has been figured out - BUT you can make the blade thinner changing this contour and gain a bit. Just remeber that there are forces on the blade and you want it thick enough not to bend. Bending the blade can be used to increase the pitch to good effect but you need to know what you are doing.
3. You can bend the blade - take a look at The prop Duplicator first!! The best one for us is cupping the tips - especially useful on high lift props - reduces lift and increases thrust - you only need to do the tip - consider the water flow across the blade and try and fit that.
Conclusion
I hope that this has taken some of the mystery out of prop sharpening - especially for beginners, it's not that hard, it will improve your performance at the lake and you will never get good at it unless you try it. So have a go today.
As there are a lot of different props and applications for props i cannot and will not give a prop reccomendation for your boat, just follow my leads and get more speed out of your boat !!
If you want more Tecnical info go to RCprops Tech info and recommended props
RC boat.com Tech info and recommended reshaping
Find our prop chart here
German explaination to proptuning
|
|
|
Choosing your prop
The most important factor in choosing the right propellor is choosing the propellor with the right amount of pitch. Like gearing a car for the proper gear ratio, one must gear the propellor to the engine by changing the pitch of the prop. Not enough pitch would be like trying to go 80 MPH in first gear, Too much pitch would be like trying to go up hill in fith gear.
A simple rule for prop sizes is that a high revving engine needs a smaller prop,a loose running boat can run a prop with high pitch,normally a Monohull or deep vee we run bigger props with lower pitch ratios
The pitch of the propellor is the distance that it travels in one complete revolution. This distance is theoretical of course.because water is not a solid medium, and the prop will slip as it travels through the water.
As the propellor thrust the water astern, the reaction to that action moves the boat forward. The deep-vee model usually runs the prop completely submerged, while the hydroplane is designed to run with the prop one half out of water. Naturally, the hydroplane will turn a larger prop than the deep vee will, because less prop is in the water with the hydroplane application. The surface drive mono is an attempt to make the mono as quick as the hydro by mounting the prop directly behind the transom of the boat and half out of the water.
|
|
|
Sharpening and balancing
You must balance the prop! An unbalanced prop will cause vibration and tear up the drive system (which will slow you down).
You'll need a prop balancer to check the balance of the prop. A block of wood with two razor blades and a shaft the same diameter of your prop is all that's needed. You can buy one if you don't want to make your own for about .00. You simply places the prop on the shaft and rest the shaft across the two razor blades with the prop sitting between the razor blades. On a level table top the prop will turn until the heavy blade reaches bottom. The blade that falls to the bottom is the one that needs to have metal taken off.
File the heavy blade until it no longer falls to the bottom on the balancer. Take only off the back side of the prop blade. The back side is the side that does not grab the water. Never file the face of the blade, where the water will be grabbed and forced backward. A dremal-tool sanding disk works much faster and easier than hand files. If one full blade doesn't fall heavy, and only the tip of one blade and the trailing edge of the other falls heavy, do not take weight off the hub to compensate for the imbalance. Take weight off the leading and trailing edges of the blades that fall low. In other words, you would take weight off the leading edge of one blade and the trailing edge of the other. The prop will eventually balance out and stay stationary when you put it on the balancer.
You can use 250-grit emery cloth to take out the scratches from the files, then use 400-grit emery for fine-polishing. If you have access to a buffing wheel, you can buff the prop to a high luster.
I myself use 800 grit up to 1500 grit polishing paper and finish it off with some simple copper shine.
You can sharpen the leading edges of the prop as you balance it, or you can wait until you have balanced the prop. If you wait until after balancing the prop, you'll have to go back and check the balance after sharping the blades. Take metal off the back of the blade only, when sharpening it. The trailing edge of the prop blade should be crossed-filed so that there is a sharp corner where the face of the blade meets the rear of the blade. A sharp trailing edge lets the water leave the blade cleanly.
|