|
|
|
 |
Engine Tuning |  |
|
How to get more power from your Zenoah 230 Pum engine As most of us run the zenoah 230 pum engine I will explain a bit on the ins and out of tuning this engine. Please note!! Powerpetes RC pages is not responsible in any way if something goes wrong and you wreck your engine !! |
|
|
|
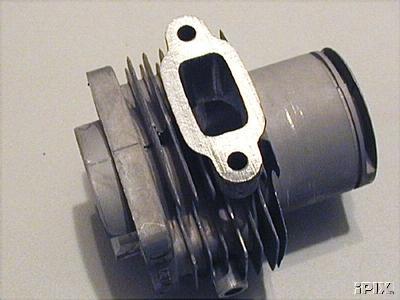
First steps Transfer matching The first thing you need to do is dissasemble the cylinder from the crankcase, as you do this make sure you dont damage the gasket. Remove the carburettor and the exhaust header and than remove the cylinder, make sure you pull it off gently as you can damage the piston ring !! Replace the spark plug for an old one to put the cylinder in the work stand. As you put the foot gasket on the cylinder you will note that it doesnt cover all the material of the transfer, if you put it on the crankcase it does. This is the first thing we will need to match to the crankcase. The areas to remove are encircled in the pic. I use a milling machine but a good dremel tool will do the trick also. Always wear hand and eye protection !! As you have to be careful not to remove too much and make the waal too thin make sure you keep it at an angle of about 60 degrees. Remove all the flush from the transfers as these will influence the flow. Also remove the flush fom the insulator to improve the flow. (its the brown thingie holding the carb) |
| 2nd step exhaust port To get a higher top speed we need to heighten the exhaust timing. there are a lot of different timings for different applications but i dont want to bother you with that. ifyou want to know some more on timing go to Carlos pages. I usually raise the exhaust port 1 1/2 mm and round the top of to get a Mid timing and tuning, this gives around 170 degrees timing and suits most monos and cats. Now were done with a Mid tuning job, you need to flush out the cylinder and clean it thourougly . I usually use automotive brake cleaner in a spray can and afterwards use compressed air to get it totally free from any debree that is left. Wear hand and eye protection if you do so |
 |
 |
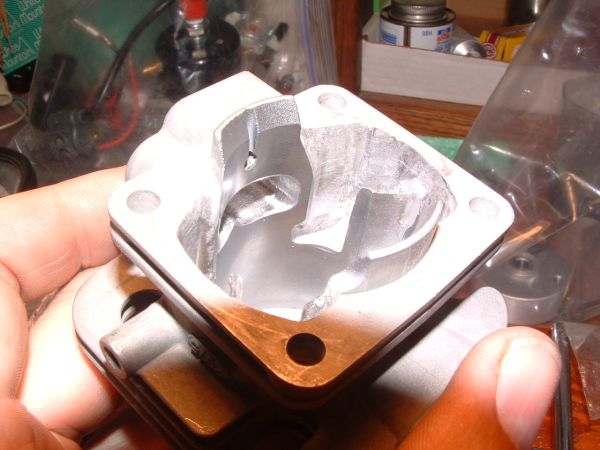
Next step Cranckase modification Ok, now for the advanced stuff. To open the engine you first have to remove the pull starter and the flywheel to get acces to the bolts that hold the crankcase together. To remove the flywheel you need the proper tool. This can be purchased from any garden equipment shop that sells zenoah engine parts. If you separate the two halves make sure not to damage the gasket or you have to buy a new one. Well after we took the engine apart make sure nothing can get into the bearings, use duck tape to completely seal the bearings inside and outside !! As you can see in the pics there can be a lot of material removed to improve the flow, the trick is to get rid of all the edged surfaces and to get a better flow of the transfers. |
|
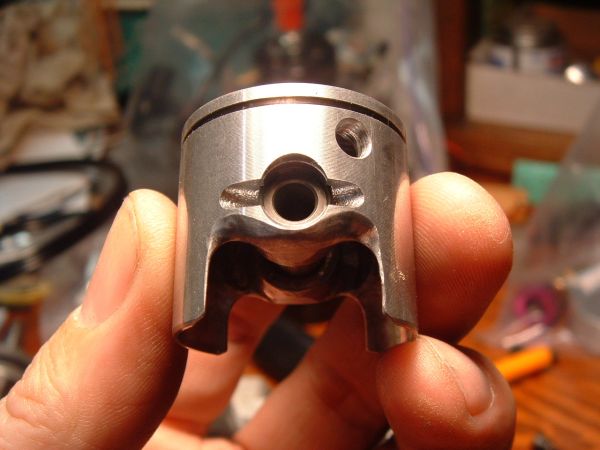
Next step fitting the G230 RC piston On the latest engine i did i replaced the original 2 ring piston with a G230 RC piston, this can be purchased from all the good engine suppliers in europe trough FG 1/5 th scale cars. The trick with this piston is the shorter sleeves and the 1 ring small ring which will give a lower inlet timing (opens earlier) and a lower weight adds about 500 revs under load. Make sure you keep the arrow on top of the piston facing the exhaust port !! If you remove the piston pin and its clips be very carefull when you place them back. Make sure you dont bend them too much and the are seated back in place properly !! A awal clip ruins your complete engine !!! |
 |
 |
Tuned pipes The performance of your engine can be ruined by not using a proper tuned pipe. There are a lot of different pipes on the market today, Mdd desings and quickdraw deliver good tuned pipes for the US market, in europe Merker and MHZ supply good and quiet tuned pipes. |
|
The G231 Engine Here is the new kid on the block , its out for half a year now and records are broken with this engine almost every day ! As the 231/260 are real fast engines out of the box, i will give only a few hints and tips on tuning these engines, the trick is mainly in lightening the piston and raising the exhaust porting, this will bring the most out of your Zenoah 260/231 |
 |
 |
How To ? Basicly the same applies for the new engines as did for the old 2 port engines, lighten the piston, raise the exhaust timing, deck the cylinder to raise compression,widen the ports. the exhaust port can be caised up to 180 on the 231 the 260 runs best with a max of 178, also widening the exhaust port helps alot, take care you dont go too wide as the pin holding the piston ring will show in the port and you have just ruined a cylinder.You can lighten the piston as shown in the pics,this especially works on the 231.. I got a lot of help on this from Scott Schneider on jims rc boat dock forum !! thanks Scott
Modify The G260pum G260PUM Specifications: Scott Schneider started a new post on Jim’s Board about how to modify a Zenoah 260. The post was a blast – as for today (03.03.03) 5.800 plus views, more than 110 participations. The information posted was so good that I edited it somehow to keep it for everybody interested – and this has to be anyone interested in R/C boats. Al Chianelli - Al Nevins – Chuck McCuiston - Dave Marles - Denny Sheckler - Frank Bonanno - Harold (HDRacing) - Jim Jellison - Jim Maples - Jim Nissen - Len (Radamus) - Marc Levac - Mike Hoffmeister - Wayne Rathbun You DO NOT need to machine cylinder base to get proper squish clearance. With the piston hitting head the plug hole to piston dome was .610" and installed on rod assembled with NO gasket it is .625" - that’s .015" clearance and we wanted @ .020 So I cut a Note pad paper gasket of @ .005 thickness and coated with Loctite 518 Anaerobic gasket sealant and assembled to a clearance .020". When lowering jug by .015 and raising exhaust timings and adjusting the exhaust timing accordingly the blowdown changes very little and does help the torque a bit. But by fooling around the transfers upper areas more damage to the powerband would happen because: There direction and entry angles are very critical to maintain a symmetrical flow pattern from both sides. As well the increases in flow volume in transfer runners makes up for the slightly less open duration by having the ports flow at a higher speed through there openings. On an unpiped motor the blowdown has to be low or it will never run properly. Raising the transfers is ultimately what is needed to get maximum power but that’s not so easy on the G23/G260's. First thing that can be done on the 260 which wasn’t possible on the G23 is to widen the exhaust port to the maximum possible without ring trapping occurring. That should be between 72 to 75% of the cylinder bore. After that it’s a trial and error rising of the exhaust to get max power and still give drivability. Raising the exhaust reduces compression ratio but the increased blowdown will enable the pipe the pipe to have more of a supercharging effect that will tend to overcome the lowered CR. In terms of transfer open duration most all of the HIGH horsepower 2 cycles have @ 120 to 124 degree duration and have there transfers set up with as much area as cylinder walls will allow and this includes delivery ports under exhaust window! As the area total of all transfers increases, the speed in the port window decreases and there in lies the problem with high transfer durations. With out an explosive high velocity blast coming out of transfer port window you cannot control the short circuit tendencies of the residual exhaust and fresh charge from mixing. In short the loop scavenging is weak and the cylinder will be lazy to replace old burn fuel/air with fresh fuel/air. Confused yet? Now take an engine with low transfers but a Lot of them, you can maintain a very high discharge velocity through transfer windows therefore having a very strong loop scavenge effect. This very strong transfer port discharge is very helpful when big port/ long duration exhaust timing is used. Pretty Deep but I think it does make a valid point to not raise transfer timings when we are gaining more area in the current engines The bridge between transfer runners should not be overly short or the ports will flow at different rates. When the piston is at B.D.C. the bridge is at the level of the piston pin. I STRONGLY suggest leaving the upper edges of transfers alone! With 4 ports now the 231/260 ports flow better than the older 230 2 port cylinder did even with high transfer timings. Our experience has been that the best approach is to leave the transfer timing alone, adjust the exhaust timing to suit your application, and don't worry too much about what the resulting blowdown angle is, as it basically comes out in the wash and ends up being basically where it needs to be anyway, when coupled to any decent tuned pipe. I widened intake port @ 3/32" each side and leveled off roof section on top right next to ring compression stub, net result is a lot bigger intake. Next remove half the length of the transfer port runners and reshape, Make sure that you maintain enough length to support ring at B.D.C. Net result a lot more transfer area. Last profile the outside edge of piston next to pin boss's to enhance flow along sides of piston. As to exhaust timings, @ 174 to *178 degrees work very well and will make great power for either monos or hydros. It's blueprinting work and flow improvement that will do the trick, so take it apart, fit it back together on one half of crankcase then the other side, follow the path of air/fuel and remove lumps and bumps, match case to cylinder joints, blend in corners and remove excess casting material that blocks the flow. You can even grind away edge of transfer passage on case and blend in around bearings Make sure that both sides are the same shape and finish. I have no way to measure H.P. but it is stronger that a full mod g230pum. Note: Some piston seizures are happening and a cure is to undercut piston Diameter @ .003 to .005 on the top 1/4" or so. The stock piston weighs at 28.8 grams The piston has lot of material on the inside by the ring area. You can take out their and the top crown some. Some builders have been taking the material from the piston crown approaching the 25 QD style, flat top, and then cutting the head to match. This combined with trimming the skirt sides and hollowing out the inside of the piston will give you a very light piston On the wristpin sides (both), I matched them the width to the transfers and took all the way up to the wristpin boss, then profiled to direct the flow "up" and at a slight angle (to the left) if piston is held with dome facing up.
Absolutely DO NOT!!!!! grind or even polish rod. They are a case hardened forging and when you grind or polish them you change the grain structure of the metal and will cause an unwanted failure. Trust Me ! ! Don't touch the rod. There is not much to be gained by doing work to the rod, but there are a lot of risks, such as abusive machining stresses, grit in the big-end bearing, etc. Personally I would spend time elsewhere. Nelson (ndking88) from Jim's Board, prepared this chart which shows how much to cut from ports to achieve the desired timing numbers. No more guess or try and error. A great work that he, gently, allowed me to reproduce. Thanks Nelson. "I made a chart in Excel for Zenoah Port Mods that some of you DIY guys might find handy. It is made in three sections, one for Intake Port, one for Exhaust Port and one for Transfer Ports. Dave Marles made a perfect resume for all this: “This has been a very interesting discussion and I'm sure it will continue. Scott's original information was excellent and provided practical and exact modifications to make to the G260. It's not very often that you see that kind of information given out. I threw a few curved balls in there because it’s easy to have preconceived notions as to the way forward with a particular type of engine. I have done that myself in the past. I think there is a lot more potential to the Zenoah G260. Many things have not been touched upon yet as far as I can see and it needs a few people to be modding the engines and sharing information to move on. 6 bhp seems to be the limit at the moment but that will be raised this year for sure but as the power output rises then several things will become much more critical such as ignition timing, plug selection, pipe design and especially compression ratio and squish action. One last word: hopping-up an engine means - always - reducing it's life when compared to the same engine in stock form. You may minimize this taking good care of your motor, mainly using first grade oil at the adequate ratio. Besides, some engines withstand better than other to modifications and high RPM. One reason for this - maybe most obvious - is the construction type of the engine. Bellow, the pic of a Homelite crankshaft cantilever type. It is only supported by bearings at one side, the other spins freely into the crankcase. This makes the crankshaft flex under high RPM, drastically limiting those RPM and engine life. Reccommended only for expirienced modellers !! Well thats it for now, Good luck with your modified engine !! Any Questions ??
|